Saturday, November 2, 2024

Moose

I post lots of trail camera images of moose out in the woods at night, but every once in a while one wanders through our yard during daylight. Or in this case, right at sunset. I hadn't looked at the backyard trail cameras for several weeks since we have been gone, and was dismayed to find that Browning #11 had dead batteries. It might have been in position to get the moose jumping the fence just before I was able to get to my back door with the DSLR. Leave it to ancient Melted Browning #6 to get a shot of the moose from Oct. 21. (It looks like the same one, but who knows?) Also, from #6 on Oct. 15 is an image of a deer buck. If you flip back and forth between the moose and deer images, you get some idea of how huge a moose is.

I want to have a camera at the choke point at the northwest corner of our property, between the fence and the rock garden (for lack of a better term). If I hang a camera on the back fence facing east (as seen below), it triggers on cars going by. At most we only get a few dozen cars a day, but with multiple exposures on each trigger, it adds up to lots of images to go through. I had to flip through 5,000 images to find a few dozen of the moose and deer. If the camera is on the fence facing west, it gets triggered by waving grass. The owner of the lot behind us hasn't mowed it for four years. With no more mowing on our lawn this year, I sunk a steel rod in the middle of the lawn facing northwest toward the fence, facing away from "traffic" and hopefully far enough away not to get triggered by the grass. I bought a bunch of t-post mounts, and with a little piece of wood as a spacer they work well on a steel rod.

DSLR yesterday
Trail camera Oct. 21
Trail camera Oct. 15

Wednesday, October 30, 2024

Late to the party

When I booked our cruise to the Maritimes, I didn't realize that it coincided with the comet of the century C2023 A3 Tsuchinshan-ATLAS. We left home just about the time it swung around the sun and put on its best evening shows. Tonight I set up the Seestar in hopes of getting it as it fades into the void for at least 80,000 years, and this is what I got. It took quite a while to locate it in binoculars, but I finally did. I tried unsuccessfully to get it with the DSLR. At 100mm it was very small in the frame, and I didn't think I could find it or focus on it at 400mm. I have received my ASIair telescope computer, but I think it is going to take a while to get my real telescope up and running. There is no learning curve with the Seestar, so that's what I used.

Even a single 10-second image from the Seestar will show the comet, but stacking is necessary to show the tail and to reduce noise. This image is 11 minutes. I shot multiple stacks, including one of more than 20 minutes. Seestar stacks on the stars, not the comet, so the stars are points and the comet head has a trail. It's hard to see since the head is a bit blown out, but there is a little bit of trailing in the first image. The second image is the long exposure, processed to show the trail formed by the head.

Monday, October 28, 2024

Photoshop AI

I've always been a bit of a purist when it comes to digital photography. I try to limit myself to adjusting levels, and applying only minimal sharpening and color saturation. But with its AI features, Photoshop is making it hard to resist "improving" the images. Take this shot of St. Dunstan's Basilica in Charlottetown, PEI. There were wires in the upper left of the image, and a there was a car parked in front. It took a few minutes and I probably could have done a bit better, but the processed image is good enough to post on the internet at 1800x1200. I cropped them differently, but the effect is obvious.

Before
After

Friday, October 11, 2024

Trailcam update

It has been two months since I have checked the cameras out in Custer Gallatin National Forest. Ten new images have been posted to the gallery "Beartooth Pass, August 2024." The location is sort of on the way to the Beartooth Pass, so I included them there. There are five cameras deployed out in the woods:

  • Browning #15: I was wondering if there was something wrong with this new camera, so I made sure to put brand new batteries in it last time. It finally produced some images, but none made the cut for inclusion in the gallery. I'm including one below, just to show that the image quality is pretty good, given that all Browning (and most other) trailcam images are overprocessed and oversharpened.
  • My brother's Campark T180 #13: This one is located next to his cabin and usually picks up moose.
  • Reconyx #7: This camera picks up a lot of deer and moose, the occasional bear, and this time a bobcat.
  • Reconyx #2: There were no images from this location except my relatives mugging for the camera. The bridge over Snow Creek it is located next to has mostly collapsed and wildlife traffic seems to have dried up. I'm considering where to move this camera.
  • And finally, Browning #5: I know I said this camera was retired, but I needed it for a new test location. The spot is where a trail splits but there is no convenient tree, so I drove a stake into the ground and used a t-post mount. The ground is rocky and the stake is not driven in very far, but it hadn't fallen over after two months. I might move #2 over to where #15 is, move #15 to this location, and finally retire #5 for occasional duty in my back yard.
New Browning #15, unprocessed
Campark #13, moose pair
Reconyx #7, nocturnal bear
Browning #5, mounted on a post because there is no convenient tree

Thursday, October 10, 2024

Bear

We haven't had a bear in our yard for more than four years, but a little bear came sniffing around our plastic pumpkins last night. This is from the Ring doorbell, processed a bit to increase the contrast. I used to have a Blink camera aimed at that spot from the side, but it became unreliable and I quit putting batteries in it. Now it is just a dummy camera. I only have one trailcam in the yard right now, in the back, and it didn't get anything.

Wednesday, October 9, 2024

A lot going on

After yesterday's accidental Northern Lights, I decided to go for it intentionally last night. The first picture is 660 30-second images from the 5D/14mm lens. I spotted a few faint trails that might be meteors, but I think most of the stuff in the lower left corner is satellite flashes. The shooting time was 5 hours, 40 minutes, and the battery (the good one) gave out at 2:17 am. (Unlike with the ancient 1D, Canon did not give me an AC power adapter with the 5D or 6D. The official Canon AC adapter is $140 but I found a knockoff with good reviews on Amazon for $21 that should work with both cameras.) The 660 images overwhelm the Northern Lights, so I narrowed it down to the 97 images between 11:04 and 11:54 pm that showed the most glow. StarStaX did a good job giving me preliminary views and I could have used those composites here, but for these "official" images I did them in Photoshop.

Below that are a couple of Northern Lights single frames. Not as vivid as the previous night, but technically better. With the exposure shortened from 90 seconds to 30, the structure is more defined and there is no obvious star trailing.

The next few nights I am considering doing some 30-second exposures, but not continuously. Maybe with a minute in between. It seems when the Northern Lights start up, they last for a little while, and I don't need to do any more huge star trail stacks again soon. That would still get me 240 images in the six hours starting at 8 pm.

Stack of 660 images
Stack of 97 images with Northern Lights
11:11 pm
11:12 pm

Tuesday, October 8, 2024

Oops!

I used to work with a nose-to-the-grindstone guy who complained that "those darn holidays" were interfering with him getting his work done. Maybe he was joking; we weren't sure. Last night, I tried to shoot the Draconid meteor shower and those darn Northern Lights interfered. My plan was to shoot 90-second exposures over seven hours and stack them. The result would be a star trails image with streaks of meteors running through it. It was doomed to fail as the intervalometer wasn't retriggering in a second, so there is a 90-second gap between all the images. Just for fun, I did a quick stack in StarStaX and it turned out better than I thought. Without the gaps, maybe it would have been interesting, but there are no meteor trails evident. A suspected meteor trail (image #2) does not even show up in the stacked image (#4) as it was in the lower right of the frame where the Lights were the brightest.

I'll try again tonight with (a) shorter exposure time of 25 seconds rather than 90, (b) the full-frame 5D rather than the 1.3x crop 1D, and (c) pointing more directly north rather than northwest. If nothing else, I will end up with another star trails image.

And these are my first Northern Lights images. I did not see them visually, but that 14mm f/2.8 gathers in a lot of light in 90 seconds.

8:34 pm, Big Dipper visible lower part of the frame
8:49 pm, I think this is a meteor just below the Big Dipper
11:30 pm, Big Dipper has mostly rotated out to the lower right
Failed stack

Sunday, October 6, 2024

Jordan

I was looking for an image from 2002 and accidentally came across this one from Nov. 14 of that year at the MCI Center in downtown DC, Washington Wizards against the Utah Jazz. Scoring 19 points in a 105-102 win for the Wizards was #23, Michael Jordan. I only had my little Canon Elph camera with me and I was way up high, but there's Jordan at the center circle during a free throw. I also tried some video, but it was awful. The Elph's stills were 1600x1200 (2Mp), but video was only 320x240 at 20 frames per second. Truly primitive.

And I eventually found the image I was seeking. I acquired my first DSLR, the Canon 1D (Mark I) on Aug. 5, 2002, and the first trip I took was to Maine a week later. The lens for the image below was the humble 50mm f/1.4, which I still have but the autofocus is broken. Actually the image that has been on my web site for the past 22 years was taken with the Elph, but now I prefer this one which is extremely similar but (IMO) better image quality. We are heading back to Maine in a few weeks, which is why I was looking at my old images from there.

Saturday, October 5, 2024

Another way

After a few days of fiddling with the new telescope mount and b&w astro camera, I've decided to descend further into the rabbit hole and get an ASIAIR camera controller, basically a Raspberry Pi computer stuffed into a little box. Solar imaging connected by cable to a laptop just isn't going to cut it. The screen is hard to see in daylight to focus, and the cables I have are too short. Rather than buying new cables, I'll apply those funds to the (mostly) wireless ASIAIR. (I'll still need to use a power cord of course.)

The mount is extremely stable, but also extremely hard to see through the polar scope to align. I was reading through the Sky Watcher manual, and instructions on how to set the mount's setting circles is in the same section as polar aligning. After reading through the setting circles procedure, I was regretting my purchase decision. But after some further research I figured out that a Goto scope really doesn't need setting circles. All that is needed is an accurate polar alignment, and supposedly the ASIAIR will help with that also. That will have to wait until November due to our upcoming travel schedule.

I did use the telescope on the mount and the 6D Mark II to get this sun image, but I slewed over to it with the controller rather than using Goto. Unlike a few recent images shot with the DSLR lens filter, this is the color of the filter and the image is not colorized. The sunspots are getting interesting.

I look through old images from time to time. I took this Nov. 11, 2019 with the film filter on the 100-400mm lens/5D Mark III. The only way you can tell this is in focus is the tiny dot near the center of the Sun, which is the planet Mercury transiting. I tried my new Photoshop tricks to get more texture on the surface, and nothing. I can only imagine that the lens film filter doesn't pass those details like the lens glass filter or the telescope filter do. It's my practice lately not to upsize solar and lunar images if they are smaller than 1200x1800 pixels, so this disk is smaller than the first one. Obviously I didn't use the teleconverter that day.

Update: For years I had a Coronado Personal Solar Telescope (PST), but the internal mechanism corroded and I sold it on eBay for parts. I was never able to see much through it anyway, and it was impossible to attach a camera to it. The best I ever did was use a cell phone bracket to look through the eyepiece. So anyway, rather than go down the Coronado (Meade) road again, I ordered a 50mm scope from Lunt. I looked at something larger, but an 80mm costs at least 5x the 50mm, which is about the same price as a PST. I expect the customer service to be much better than Meade/Coronado, which is basically bankrupt. I think Meade makes (made?) their telescopes in Mexico. Lunt is an American company staffed with real people in Tuscon, Arizona.

Lunt builds telescopes to order, and they were backlogged leading up to the recent eclipses. But there are no eclipses coming soon, and they told me the wait time is eight weeks. Just in time for Christmas, and maybe I will figure out my telescope mount by then.

Wednesday, October 2, 2024

Third attempt

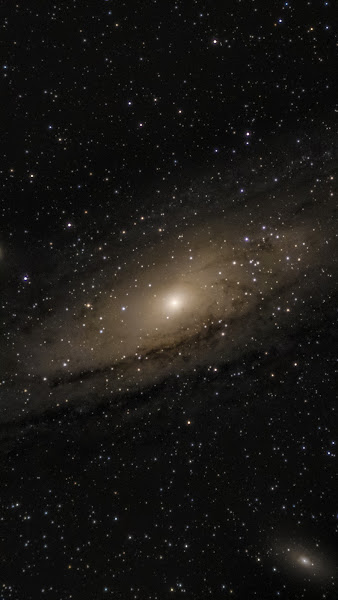
I made a third attempt at Andromeda last night with the Seestar and think this may be incrementally better. It is slightly more tilted than previous attempts, and I cropped it to show M110 at bottom right. I used Siril for stacking and most of the processing, but not the stretching. Research indicated I could just do it in Photoshop, so I did. I also got a small, unimpressive image of the Crab Nebula.

I'm going further down the rabbit hole. I am expecting delivery of a real Goto telescope mount (Skywatcher HEQ5) and a real astro b&w camera (ZWO ASI174MM) today. For now my priorities are to get good Sun and Moon images with the b&w camera and Televue telescope, and get my DSLR to work with the mount to get a tracked LANDSCAPE shot of Andromeda and other objects. Once I get all that figured out, then it's on to a filter wheel, filters, an autofocuser, and perhaps a field flattener to get better images of Seestar targets. First impressions: Learning how to align the mount will require some study and some YouTube videos. The rail supplied with the mount is useless, but my standard tripod plates will work. I only put the camera on the mount, not the scope, and targeting was not very good since the mount was not aligned. On the other hand, the ZWO camera was a breeze to set up and I took a test image (not attached to anything) within minutes. I will try a sun snapshot with the scope tomorrow, but it probably will be on the tripod, not the mount. That thing is heavy. From comments found during my research, I knew it was heavy, but I had no idea. I should take off the 11-lbs. counterweights before I move it. I only needed one to balance the camera, and I wonder if the scope will require both.

October 3 sun image from the 6D, monochrome, colorized. I didn't use the teleconverter, so this is at 400mm and heavily cropped. I used the Photoshop AI Super Resolution to upsize it, then cropped it to my standard 1200x1800 (4x6 print size). We've got some good sunspots going. Remember, this is just a white light filter and doesn't show the detail of much more expensive filtering systems. Can't wait to see what the new ZWO does with the Sun and Moon.

Sunday, September 29, 2024

Nebula night

From last night with the Seestar, we have the colorful Helix Nebula NGC7293 and the wispy Pelican Nebula IC5070. I've been imaging almost every night since I got the Seestar, and the weather forecast says clear skies for the next week. But I'm running out of things to point at until the seasons change. I wonder how well the Seestar will capture the Draconid meteor shower Oct. 7, or whether I should just do timelapse for about six hours with the 1D and the 50mm lens. It will be near the bright star Vega so I should be able to find it.

Saturday, September 28, 2024

Another night, another galaxy

Last night's Seestar session produced a fine image of Bode's Galaxy M81.

After that, I turned the scope toward Pluto. There's no way to know which of these dots is Pluto, so the solution is to shoot it again tonight and see which dot has moved relative to all the others. (I compared the first and last images in the sequence, taken 24 minutes apart, and could not tell from those.) That's what Clyde Tombaugh did back in 1930, of course back then he had to spend hours exposing photographic glass plates, then flip between them to see any changes.

BTW, I presume the line in the first image is a satellite. With the distance it traveled in 10 seconds and the lack of red/white dots from a flashing light, it is not an airplane. There were some other frames in the stack that had shorter tracks that didn't make it to the final image. And when I did the manual Deep Sky Stack, none of them were evident. Back in 1930, Tombaugh didn't have to worry about satellites streaking across his images.

This the Pluto Discovery Telescope at the Lowell Observatory, Flagstaff, Arizona taken back in 2002. It is a relatively-modest 13-inch refractor. Like the Seestar, it is an astrograph, i.e. a photographic instrument with no eyepiece.

Update: I shot Pluto again the next night and compared the images. After manually aligning the two images in Photoshop, I think I found it. It almost merged into a star, but it is the lower of the two dots.

Friday, September 27, 2024

A week of Seestar

After a week of imaging with the ZWO Seestar S50 (now designated as camera #20 on my remote trigger list), I have come to a few conclusions. First, it is a low-resolution deep sky camera for a limited number of objects. That's not a criticism, just a realistic assessment. Second, although the device is very easy to use, the key to producing good images comes afterward in the processing. The ease of use of the equipment can be overwhelmed by the difficulty of processing.

In that week, I have produced acceptable images of M31 Andromeda Galaxy, M33 Triangulum Galaxy, M101 Pinwheel Galaxy, NGC 281 Pacman Nebula, NGC6992 Eastern Veil Nebula, M27 Dumbbell Nebula, and M16 Eagle Nebula. I have attempted to process these images with varying degrees of success in the stacking and processing program Siril. But I have decided the best stacking program for me at this time is the one built into the Seestar app. Not the real-time stacker that runs during imaging, but the Deep Sky Stack that is an option on the main screen. The only thing I'm using Siril for is to remove the green cast that many of the images display. All of the other processing -- noise reduction, levels, color saturation, contrast and sharpening -- is done in Photoshop. Maybe a skilled Siril or DeepSkyStacker or Registax user can make something far better than the automation within Seestar, but I'm not sure it is worth learning how to do it given the low-resolution nature of the source material.

The Seestar is a fun device. At a reasonable price of $499, it has given me a capability I never had before, to image deep sky objects. As mentioned in the previous post, it also can shoot the Sun, Moon and planets, but not well. Some may find the lack of an eyepiece to be objectionable, but whenever I looked through it I never saw much anyway. (Especially since I was getting progressively blind until I had cataract surgery in October 2018.) Even if you have good eyesight, you will not see the blazing color of these objects through the eyepiece. Colorful photographs are formed from minutes or hours of exposure time, and that is what Seestar attempts to do.

The Seestar is a flawed instrument...but ALL cameras, telescopes and optical devices are flawed in some way. It is fun to use and I can't wait for the seasons to progress and the Orion Nebula to come into view. But I do want to list my pet peeves:

  • The image is 1,920 pixels high by 1,080 pixels wide. That's the shape of a phone screen held in portrait mode. Not everyone wants to do all of their image processing in a stupid phone app.
  • Also, 1,920 x 1,080 isn't a lot of pixels, and the field of view is very narrow. Andromeda does not entirely fit. That's one reason I might be interested in the Dwarflabs Dwarf 3, a similarly-priced device with four times the resolution and a wider field of view. (And not portrait.) But it is a new model and as of today is still listed as 'preorder' on B&H.
  • There is no way to schedule a shoot. You have to be there to push the button at the beginning and at the end. If there's something I want to shoot from 3:00 to 4:00 AM, I don't want to have to be there.

There was a vague announcement from ZWO Wednesday of a new Seestar. Since I only got this Seestar S50 a week ago, I feel sudden obsolescence, but on the other hand I think it will be at three months before there is product being shipped from China, and maybe a few months after that before most people can actually get one. That's time for me to figure out what I'm doing with the current device, and more importantly, with the processing software. I was thinking back to the early days of the DSLR. I jumped in with the Canon 1D in August of 2002. Two years later I upgraded to the 1D Mark II, which had a larger sensor and better noise control. Eight years after that, I got the 5D Mark III, which I believe still compares favorably to new models in terms of image quality under most circumstances. So in my experience with the DSLR, it took 10 years for it to evolve into a modern device. There were DSLRs before I got my first one, so maybe it was really 15 years. And regarding the processing software, that also has evolved dramatically since 2002, and some of my old 1D images benefit from a new Photoshop session 22 years later. I'm not getting any younger, so I'm not waiting around for the next model to come out. When the time comes, I get a new one and the old one goes on eBay; until then I try to get proficient.

Here are the images so far, some with additional comments.

M31 Andromeda Galaxy: The Seestar's field of view is too narrow to fit the entire galaxy.

M33 Triangulum Galaxy

M101 Pinwheel Galaxy

NGC 281 Pacman Nebula: Color in astronomy images is subjective, but this is a bit dim.

NGC6992 Eastern Veil Nebula: Deep Sky Stack turned this image sideways, so this is from the real-time stacked image that Seestar saves automatically as it is shooting. It is a bit dimmer than I would like, so I might try the processing again, using fewer of the 253 images.

M27 Dumbbell Nebula

M16 Eagle Nebula: In the middle of the nebula are the famous Pillars of Creation. They are small and fuzzy, but if you zoom in, they are visible. Hubble gathered thousands of times more photons to make its iconic image.

Friday, September 20, 2024

Automated Astromomy

I have been dabbling in telescopes for more than 20 years, but I have never taken the financial plunge necessary to get involved in deep sky astrophotography, taking pictures of (for example) other galaxies. I have the telescope, or "Optical Tube Assembly" as they say, a Televue 85. But I don't have the star-tracking mount or other accessories necessary to take proper images of deep sky objects. I've gotten the urge lately to investigate doing this, finally, and I came up with three different tracks with different price points. I know enough about amateur astronomy to know there is always one more gadget to buy, one more upgrade that can be done. But the starting points, from most expensive to least, break down like this:

  • $3,000: This includes a cutting-edge harmonic drive equatorial mount, such as the ZWO AM5N, field flattener, and a dedicated astronomical camera. This does not include a new telescope as I would be using the Televue 85, but I would need a mounting rail. These new harmonic mounts are supposedly easier to set up and are lighter than more traditional mounts, such as:
  • $2,000: A traditional German Equatorial Mount such as a Celestron Advanced VX, autoguider, field flattener, and a dedicated astronomical camera. Once again, I would be able to use the Televue 85 but would need a mounting rail. This equipment requires careful polar alignment every time it is set up and there is a learning curve.
  • $500: A smart telescope, either a ZWO Seestar 50 or a DwarfLabs Dwarf 3. These scopes don't even have eyepieces, so are considered astrographs. They can be set up in a matter of minutes and don't require a bunch of other accessories. The downside is the image quality can't measure up to the other two equipment bundles. There are more expensive smart telescopes with better image quality, but I thought I would try the cheap ones first. I ordered the Seestar because it was in stock. The Dwarf 3 is a new model and has not arrived in the US yet. I did contemplate pre-ordering the Dwarf 3 but decided to wait until after it is available and some people form opinions on it. I envision selling off these starter scopes as more advanced scopes become available. But if I lose interest, the investment is not that great.

So I received the Seestar today. Because the sun was poking through the clouds and it does not look promising for getting a galaxy tonight, I got a few snapshots of the sun with the included solar filter. The weather looks good Tuesday-Friday of next week for a real shakedown cruise. One thing I don't like already is the Seestar's 1920x1080 vertical orientation, which I squared off here to 1080x1080. (The Dwarf 3 has a lot more pixels, 3840x2160.) I guess since you control the scope with your phone, ZWO wanted the images to fit comfortably on a phone screen in the usual orientation. Another immediate dislike was the user manual, which helps you get set up but doesn't tell you the best way to take and process images. It's like the first half of a user manual.

Since purusing a manual to figure out how to do things is not an option, I'll have to spend a few days looking at YouTube videos. But it took no time at all to figure out how to take this snapshot. When told to look for the sun, the scope found it within a minute. My guess is the built-in GPS tells it how high the sun should be in the sky at that moment, and it spins around until it finds it. This image is not as good as ones I've taken with a DSLR or mirrorless (included below), but I didn't get the SeeStar to take pictures of the sun.

SeeStar

Canon M100, zoom lens at 400mm

My attitude has been that I can theoretically take a wildlife photo as good as one taken by a famous pro because we have the same equipment. But for astronomy images, an amateur can't compete with the big scopes that cost billions of dollars to build and (sometimes) shoot into space. I've finally decided that I'm not competing with Webb and the Hubble, but I would like to take a few deep sky images that I can call my own.

Attempt #2: On the 21st, I took some videos of the Sun and attempted to process them through ASIVideoStack, a free program from ZWO. I don't know what I am doing wrong. There is a processed image here, but there is a severe grid pattern that is is obvious depending on the magnification. I also tried various other programs and finally was able to get a very soft-looking result in AutoStakkert. Anyway, here is the ZWO product, followed by a single snapshot processed with Photoshop. The quality is about the same as yesterday, but the spots are different and there is no wispy cloud passing by. It appears Seestar processes deep sky images differently than solar system objects. If deep sky works, I don't care if the solar images suck, although I would like to get some comets. If I need an image of the Sun, I will use one of my Canon cameras.

Monday, September 9, 2024

Star Trails, conclusion

Since I did my first star trail experiment August 28-29, it has been moonless and mostly clear, so I have done seven more overnight sessions. I used all three of my DSLRs and two lenses, trying to determine settings that will work for me if I ever find a more interesting foreground I want to use rather than my neighbors' houses. As I said in that original post, "you can make this as simple or as complex as you want to."

The simple version is: Use your camera's built-in intervalometer to take 360 images with the widest lens you have. Suggested settings are 3600K color balance, maximum aperture (probably f/2.8 or f/4), ISO 400, 30-second exposures, high-quality jpg. Import them into the free StarStaX program and hit "Start Processing." Save the result. The more complicated work flow is shown at the end of this post below the images.

The first two images are from my second session and are still a couple of my better ones. I might redo the star trails image to remove some of the extraneous noise, such as the airplane track that cuts right through Polaris. The single frame is from about an hour into the three-hour shoot and shows a satellite flare and two partial airplane tracks. The frame was processed with a color balance of 3500K and lens profile correction. One lesson learned quickly is not to use lens profile correction in Lightroom when preparing hundreds of images to be stacked. A weird moire pattern can result. But for this single image, it is fine.

Color balance 3500K, with lens profile correction

The night of Sept. 4-5 was a disaster for star trails as passing clouds muddied up the composite image. But there were moments when it was clear, and I processed this single frame of the Milky Way. My next potential project is taking multiple images of the Milky Way and stacking/aligning them to bring out more detail. This is just a single 30-second image, which is about as long as you can go with a 14mm lens before the movement of the stars becomes evident. This frame was processed with a color balance of 3300K, which is probably a bit too cool.

To this point I was shooting with my 6D because it is the only DSLR I have with an intervalometer. The maximum exposure time is 30 seconds; anything longer and you have to use the bulb setting. The maximum image count is 99 or unlimited, so if I wanted to shoot 240 images I had to set it on unlimited and go out in the middle of the night to stop the camera. For the Sept. 5-6 session, I received my new intervalometer gadget so was able to switch from the 6D to the 5D and shoot longer exposures with the bulb setting. This is a composite of 3-minute images, ISO 100, over four hours. It doesn't take Photoshop as long to stack 80 images as it does 480 images. I didn't scrub this image for color balance (which was shot at 3300K) or airplane tracks, and there is a corner of the house showing at upper right. I set the intervalometer to shoot 120 images in six hours, but I negligently put an old battery in the camera and it died after four.

For the Sept. 6-7 session, I switched to the ancient 1D, which has a sensor crop of 1.3x. This means the 14mm lens only gives coverage of 18mm, less wide in other words. This composite needed to be cleaned up due to the car headlights shining right into the lens.

The final image shows the 1D again, this time with the 24-105mm zoom set on 24mm. With the 1.3x sensor crop, it is equivalent to 31mm. Settings were 261 images over 6.5 hours, 90-second exposures, ISO 400, color balance 3600K. I shot a dark frame and subtracted it from the composite, hopefully reducing some of the sensor noise. I pointed west toward Red Lodge Mountain, which gives a different pattern than aiming north toward Polaris. It was smoky overnight, and the trails near the horizon are fainter and oranger as a result.

Here is the workflow I have developed so far. It looks like a long list but is not that complicated. Just time consuming.

  • Suggested settings for a Canon DSLR are RAW file format, ISO 200, 90-second exposures, 14mm lens, f/2.8, color temperature 3600K, at least 160 images over four hours. Set up and focus the camera when it is still light.
  • Turn off the overnight lawn sprinklers.
  • After it gets totally dark, put the lens cap on and shoot a dark frame. It would be better to shoot the dark frame at the end, but usually the session ends when I am asleep.
  • Remove the lens cap, set the number of exposures on the intervalometer and start shooting.
  • Go to bed.
  • In the morning, retrieve the camera and turn the sprinklers back on.
  • Import the images into Lightroom, including the dark frame.
  • Select a random frame somewhere in the middle of the shoot, and click "D" to show the "Develop" screen. Adjust exposure, saturation and color balance. Make sure "Enable Profile Corrections" is UNCHECKED. Leaving this checked can cause moire patterns in the combined image. I saw this with the 6D, but I forgot to do it with the 1D and appear to have gotten away with it.
  • Go back to the "Library" view. Right-click on the frame you just edited, scroll down to "Develop Settings," and choose "Copy Settings."
  • Select all frames, including your dark frame, right-click, "Develop Settings," and "Paste Settings." Click on an image other than your source image and click "D" to make sure the settings got copied.
  • At this point, I'm done with Lightroom and switch over to Photoshop.
  • Select "File," "Scripts," "Image Processor." In section 1, select the folder containing the files just processed in Lightroom. Section 2, select an empty folder to contain the converted images. Section 3 select "Save as TIFF," no compression or resizing. Ignore Section 4 and run it. It will take a while to convert all the source files to TIFF files.
  • This part can get tedious. Inspect all of the TIFF files for airplane trails, satellite flashes, car headlights and anything else you don't want in the final image. Loading batches of files into StarStaX can help find the frames that need to be edited. Going back into Lightroom and looking at the high-resolution previews also will help. Usually the "Remove" tool in Photoshop is your best bet for getting rid of this stuff. Overwrite the original TIFF with the edited version.
  • Select "File," "Scripts," "Load Files into Stack." Select all of the TIFF files except for the dark frame.
  • It will take a while to load all the files. In the Layers window, select all of the files and change the dropdown that says "Normal" to "Lighten." The star trails will magically appear.
  • Select "Layer," "Flatten Image."
  • Save the image with a unique name as a TIFF (Like "StarTrails07.tif") in the same folder as your other TIFFs and close it.
  • Select "File," "Scripts," "Load Files into Stack." This time select your new file ("StarTrails07.tif") and your dark frame.
  • Select only the dark frame in the Layers window. Change the dropdown from "Normal" to "Subtract."
  • Select "Layer," "Flatten Image."
  • Select "Filter," "Camera Raw Filter" and make any last-minute adjustments to exposure, saturation and color balance.
  • Save the file as a TIFF, using a new name if you want.
  • Crop the file to the desired dimensions (I use 1800x1200). You can sharpen now if you want, but I usually don't. Save as JPG and post to the internet.
  • Eventually you are going to want to delete those hundreds of TIFF files. They take up eight times as much space as the original RAW files because they are uncompressed. But make sure you are done with them otherwise you will have to do all the tedious edits again.

Wednesday, September 4, 2024

Fall approaches

It gets late early in the mountains up north. The bluebirds are still here, but one of these days they will not be. So I set out the Canon 5D Mark III #8 with the 24-105 zoom at 105. I didn't get them them splashing, mostly just sitting there. Try again.